Friday, October 21, 2011

Step 2: Keep it Interesting

It's easy to talk about cooking dinner more often.  Not so much easy to do, especially when you're a restaurant addict like me.  My solution to the whole "I'm sick of cooking dinner" problem was to stop skimping on groceries.  I was raised by an amazingly thrifty mother who taught me the ins and outs of saving on groceries.  I know how to pay attention to prices and stock up.  I can cook cheap meals and make things last.   But I just can't keep on doing it, you know?  Halfway through week two and I'm signing my name to a $50 dinner out. 
Nowadays, I try to only buy good food (Diet pepsi and kraft mac and cheese, notwithstanding!)  Organic produce is a great place to start, and of course we already talked about my adoration for wonderful bread.  When we eat meat, it's usually chicken, usually that chicken is organic, and in drumstick form.  (Much cheaper than organic chicken breast!)  Having lovely ingredients in the house keeps me inspired, and keeps me feeling kind of restaurant-y.  There is a fine line between improving your grocery selections and pressuring yourself to have The World's Best Cart at Whole Foods.  I've done it to myself too many times, and I don't recommend it.  Use what you have.  Organic is better for our planet and health, but if you can't afford it or don't have access to it, just let it go, and use what you have. 

So with all this in mind, we have tonight's dinner.  Something that I've never made before, but it came out great and was liked by all!

Pasta Primavera!

You'll need:
1 - 1lb box of pasta, I used bowties
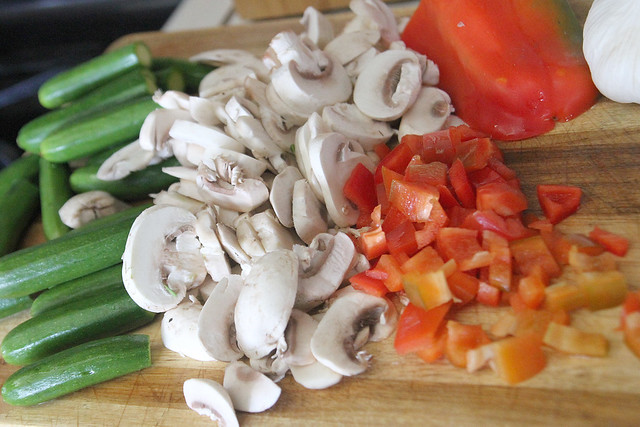
Fresh veggies, whatever kind you like.  I used
1 red pepper
1 package of mini zucchini (Trader Joe's) Probably equivalent to 2 regular sized zucchini
1 package mushrooms, sliced
1/2 an onion
1 scallion
Garlic
Salt
Pepper
Butter
Olive Oil
Chicken or Veggie stock
Milk (Cream if you're fancy)

Fill a large stock pot with water and put it over high heat to boil.  While it heats up, start prepping your veggies.  I diced my peppers into 1cm square-ish pieces, finely chopped the onion, sliced the mushrooms and cut the zucchini into 1" chunks (I'd do large slices on an angle with regular zucchini)

Lovely pasta primavera veggies

Start a large skillet with a pat of butter and a tablespoon of olive oil, over medium heat.  Once it is hot, throw in the onion and pepper.  I personally prefer my onions and peppers well cooked and without too much crunch left in them, if you like yours crunchier you might consider waiting until later to start your vegetables.  Sprinkle the whole party lightly with salt and black pepper, and add a little garlic, too. 

Keep an eye on your water and put the pasta in once it is rapidly boiling.  Stir, stir, stir.  Oh, and salt the water, too.  Lower the burner under the water to medium.

After the peppers and onions are soft and bubbling in some of their own juices, add the zucchini.  Zucchini looks yummiest when it has some caramelization on it's fleshy parts, so it's best to add it to the pan, give the pan a little shake, and then leave the darn thing alone for a couple minutes.  Too much stirring too early on will mess it up.  Watch the heat, though, you don't want to burn it.  Adjust the heat as needed.

Once the zucchini has a little color, add the mushrooms and scallions.  When I added the mushrooms I added another couple tablespoons of oil as well.  The pan will now be sufficiently crowded and your house will smell like amazing.

(Your noodles might be done.  Consider checking them now.  Your veggies can sit and simmer while you deal with the pasta.  If they aren't done, they probably will be soon.  Take thepasta off as soon as it's al dente.  The veggie part of this recipe is VERY forgiving and can sit on the stove for a minute just about any time during the cooking process.)

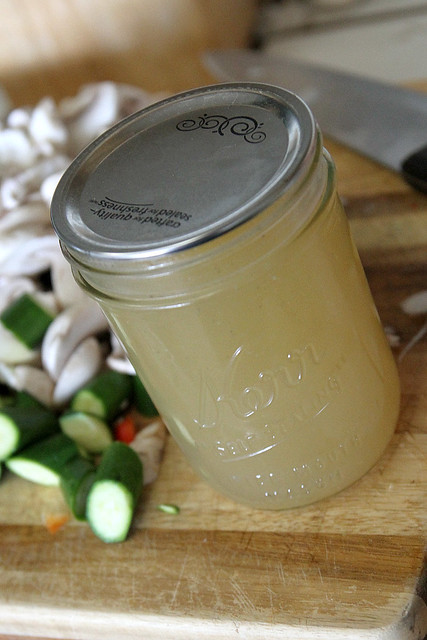
Once the mushrooms are looking mostly cooked, add your stock.  I used about 3/4 cup of homemade chicken stock.  I cannot recommend home made stock enough.  It will change your life.  But I also understand that there isn't always time or inclination to make it yourself, in which case, store bought works well, too. 
Game Changer

Once the stock is hot and bubbly, add about 3/4 cup of milk or cream.  I used 2% milk.  Cream would make the meal a lot richer and probably quite delicious.  Milk was perfectly adequate, though.  Stir the whole situation together and taste the sauce.  You'll probably need a little more salt, pepper and garlic now. 

Leave it to simmer for a few more minutes. 

While the veggies simmer and the noodles hang out, open a can of refrigerator biscuits.  (Old habits die hard, I'm sure there's some less processed alternative, but this is what I had on hand)

Spray 6 cups in a muffin tin with nonstick spray.
Rip or cut each dough round in half
Drop 2 dough halves in each cup
Drizzle (ever so lightly) each cup with a teensy bit of olive oil
Sprinkle each cup with fresh parmesan, garlic powder, salt and pepper
Place the rest of the dough pieces on top of the parmesan sprinkled dough - you might have an odd number in which case you can rip the remainders into quarters to make each dough/cheese conglomeration roughly even in size.

Bake at 350 for about 10 minutes (when you put your bread in, put the pasta and veggie mixture together and stir it all together.  Add a little parmesan and taste again.  You might want a little more salt and pepper)

I didn't time this, to be honest, so I recommend maybe ignoring my time suggestion and just watching these yourself.  When you smell them, check on them.  If they're still totally white on top, but kinda brown on bottom you can switch on your broiler and let the tops brown.  Once again, be careful with the broiler.  It goes from lovely browning tool to evil dream crusher in about a half second. 

Garlic Parmesan Biscuits

Now it's time to call the little ones to the table.  Make them pour the drinks and get the silverware! :)

Enjoy!

I need better food styling here, this makes it look like it wasn't very veggie heavy, but it was.  It was actually a perfect balance of veggies and noodles.
90/365 - Pasta Primavera

Monday, October 17, 2011

Step 1: Cooking Dinner

Long before I ever entertained the idea of giving up my business, the first step I took toward getting back to the mom and wife I wanted to be, was making a plan to cook dinner more often.

I have always loved to cook, but I REALLY love to eat out.  Probably more than I should even admit.  Even today, eating out is my largest vice, and I imagine it probably always will be. 

Because of his work schedule, my husband is only home at dinner time once or twice a week, so I had always figured cooking dinner didn't matter.  The kids and I would eat out, or grab something easy, and he could get himself food when he was hungry.  Our method kept us all happy for a time, until he finally told me that he wished I would cook dinner more often. 

I think I replied with something along the lines of, "What do you care?  You're never here at dinner time." 

You know, because I have a wonderful way with words. 

But he said he didn't care.  He'd warm it up when he got home, but he just loved the idea of coming home to a plate of food. 

And I guess I couldn't argue with that.  It made sense after all, that something I made with my hands,  would make my family feel a little bit more loved.  I guess the fringe benefit is that I feel loved, and needed, and useful, too. 

So, with all this in mind, how about a recipe?

I love to make up my own recipes, which I have learned is a bit much in the pressure department.  (My new job is to figure out how to stop putting so much pressure on myself!)  But, I finally have a good repertoire of recipes that are simple and healthy and delicious.

Cast your gaze upon the wonderfully delicious White Lasagna with marinara and AMAZING bread:

89/365 - White lasagne with red sauce and ridiculously good bread


The prep on this was really simple, and you can modify it to fit your needs.

Ingredients:
-1 box of oven-ready lasagna noodles (but it never hurts to have a second box on hand, just in case)
-1 15oz container ricotta
-Mozzarella - I use fresh wherever possible.  I usually buy one container of perlini (pearl-sized mozzarella balls) for ease of prep.  Of course, you can buy a bag of already grated mozzarella or grate your own, or slice the larger balls of fresh mozzarella, too.
-Parmesan cheese (any kind works, but I like fresh best!)
-Minced or granulated garlic, as well as salt and pepper.
 -Fresh spinach leaves washed and ready to go
-Marinara sauce - whatever kind you like - if you have homemade, you rock and I want you to teach me how to make it.
-2 cups of fresh White Sauce

Don't know how to make White Sauce?
My quick instructions are as follows:
Make a roux by melting a couple tablespoons of butter in a pan, and adding an equal amount of flour to the melted butter.  Let the roux bubble for a couple minutes, whisk it well so you don't have any lumps.  Pour a bit of milk in.  In this case I used about 2 cups.  Whisk some more.  Add whatever you'd like to add to make it taste yummy.  Your options include garlic, salt, pepper, Parmesan cheese (or any kind of cheese, for that matter).  Taste it and make sure it's good.  A truly delicious white sauce will be perfectly salted, and usually it takes a little more salt than you think it will.  Bland white sauce is, well, bland.  The roux you made at the beginning will thicken the sauce.  If it gets too thick, add a little more milk.  You will use this recipe a lot, so it's a good one to know and use and practice often.  Make this before you start the rest of your lasagna prep and set it aside so it is ready when you need it.

Instructions:
Spray a 9x12 baking dish with nonstick spray.  Start by placing one layer of the oven-ready lasagna noodles in the pan.  Pour about 1/3 of the white sauce over the noodles.  Next, put a layer of spinach leaves down.  Do this to your taste, some people like more, some like less.  I do two good-sized handfuls. This is your first layer.

The second layer will be a cheese layer.  Start with another layer of pasta, then add the ricotta.  It can be somewhat challenging to spread the ricotta evenly, but there are a few tricks.  I usually scoop out about 4-5 large dollops and drop them, evenly spaced, onto the pasta and then spread them out with a silicone spatula.  You can also add a couple tablespoons of milk (or marinara sauce when making traditional lasagna) to the ricotta and stir it in, to thin it and make it easier to spread.  Once the ricotta is spread, spread the mozzarella, then sprinkle Parmesan.  I usually sprinkle granulated, or fresh minced garlic on every other layer, pepper on every other layer and salt only once during prep.  Now is a good time to add some garlic and pepper.  This is your second layer.

The third layer will be a repeat of your first: pasta/white sauce/spinach
(make sure you save some white sauce for the top layer!)

The fourth later will be a repeat of the second: pasta/ricotta/mozzarella/Parmesan/
 (It is very important that you reserve some mozzarella and Parmesan for the top layer!)

On this particular day I had the perfect amount of ingredients to do a perfect four layer lasagna.  This does not always happen.  You can wing it when you start to realize your ingredient balance isn't working out, that's why it never hurts to have a second box of lasagna noodles on hand.

To finish your lasagna, add the final layer of pasta to the top of the pan, pour the remaining white sauce over the pasta and sprinkle the reserved mozzarella and Parmesan and lightly salt, pepper and garlic the top.

Cover the pan tightly with foil.  This is important because the trapped steam is what will ultimately cook your noodles.  Bake at 350 degrees f for about 40 minutes.  Check it by piercing with a fork or butter knife.  If it feels tender, I usually cut a small bite from the edge and taste it.  The cook time on this is pretty flexible and can vary based on the kind of pasta you use.  If it isn't tender when you check it, throw the foil back on and cook it for another 10 minutes, then check again.

When the pasta is tender remove the foil and allow the top to brown for 5-10 minutes.  It will get bubbly and golden and lovely. 


While your lasagna bakes, warm the marinara on the stove top and prep your AMAZING bread.

For the AMAZING bread, you'll need:
-1 loaf of delicious bread.  I like Pugliese or Ciabatta or really anything yummy looking in your grocery store's bakery department. 
-Olive oil
-Salt/pepper/garlic

Instructions:
Slice the bread about 1 1/2" thick.  This makes for a great crunchy-to-soft ratio.  Lay them out on a baking sheet and drizzle with olive oil.  Do this a little while in advance so the oil can soak in really good.  Sprinkle each slice with a tiny bit of salt, fresh black pepper and garlic (right now I'm using up a giant container of granulated garlic from Costco, but you can use fresh garlic, too!)  I make this same bread without garlic sometimes, too, which is also delicious.

Just let the bread sit there while your lasagna is baking, and when you take the lasagna out, change the oven to broil, and put the bread in.

Now: watch.  While you cut servings of lasagna, keep an eye on the bread.  Don't burn it or you will cry.  Believe me, I have cried over burnt bread more than once in my life.  It will probably take about 6 minutes or so to get nice and golden.  There is a VERY fine line between done and burnt.  Once it looks a little bit golden, start watching it like a hawk.

Here is another photo of my plate, with a better view of the aforementioned AMAZING bread:
Another photo, with a better view of the AMAZING bread you've heard so much about

Serve the lasagna with the marinara drizzled over the top of it.  Use meat sauce if you prefer a non-vegetarian dinner.  Have a piece of your AMAZING bread on the side.  Green salad is an excellent accompaniment to this meal, as well.

Enjoy!  Everyone in our family loved this meal.  One 9x12 pan fed the four of us for two meals.  My kids eat adult-sized portions now, so it might even feed your family for more than two meals.

The bread, of course, is gone in one meal.  No one can keep their fingers off of it.

Hello!

Hi there. My name is Emily, and I'd like to document the journey that our family has begun, toward a healthier, happier, simpler life. A life that is lovely and comfortable not because of the money we spend to make it that way, but because of the work we do, the time we take and the love we share.

For some years I worked feverishly, convinced that earning more money would somehow free me. Not because I was obsessed with money, but because I thought that a lot of money would free me to go the places I wanted and do the things I wanted. It would give my children experiences, and make my home beautiful, it would put delicious food on our plates and amazing photographs in our family albums. I thought that a great life just wasn't cheap, and I was prepared to work to earn the money to create that great life for our family.

I saw it as a healthy pursuit.

But as years passed and I found my tears pooling on my desk almost nightly, I finally realized that none of this was working. I was tired, I was overwhelmed and I was missing out on the joy that life can hold.

When my son turned 9 years old I flippantly said, "Well, I'm halfway done." And the sound of those words shocked me. I'M HALFWAY DONE. Halfway done raising my only son.

Those words pushed me toward a change. I knew that pushing myself to the farthest reaches of my own capabilities wasn't working. I knew that my idea of my priorities, and my actual priorities were not aligning. It's easy to say that family is number one, it's another thing to realize that your business (and clients, and meetings, and deliveries) are really number one.

Of course there are many more layers to our story, and I look forward to sharing all of them, as time passes. The journey that began as an idea, when my son turned 9, is now my daily pursuit. A daily pursuit that I work toward in positive directions sometimes, and I leap far away from, other times.

Today that 9 year old boy is an 11 year old young man, his sister is 9-going-on-10, and the great downsizing of our life has truly come to fruition. No really. It has. Folks, this past weekend, I started a COMPOST bin.

But welcome, to a little place where I hope to share the little things I've learned since I moved on from a life as an overworked mom, to a life where I have the time and energy to pursue simple abundances every day.